G-Lock SpamCombat Startup Guide
Step 1. Creating Account.
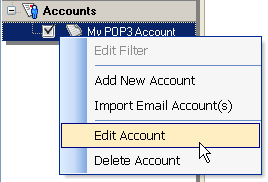
To get SpamCombat working, you need to setup an account, from which you will retrieve incoming emails. This account is already created in the SpamCombat Accounts section. You only need to fill in the required fields. To do this, click the right mouse button on the default account in the Accounts section and select Edit Account:
On Edit Account screen enter a display name for your account (any name you want), your POP3 server name, POP3 server port (usually 110), your account name and password. You can pick up the server name, account name and password from the settings in your regular email client. Look for something like Incoming Mail Server, POP3 Mail Server, or, simply, POP3 Server. If you are not able to find this information then you’ll need to ask your Internet Server Provider (ISP).
If you deal with an IMAP account, check IMAP Account checkbox, enter your IMAP server name, IMAP server port (usually 143), account name and password.
After you filled in the required fields, click Test button to test the account. If the test is OK, click OK to save the account settings.
Step 2. Filtering Emails.
Make sure that the checkbox next to your account in the Accounts section is checked and click Start button on the Toolbar to start retrieving messages.
You will see your incoming emails and their details on the screen.
The icons legend:
 | email is resolved as OK |
 | email is resolved as Spam |
 | email is flagged as unknown. Click either Mark as Spam or Mark as Good button to categorize an unknown email. |
 | email is not resolved because of a bad Internet connection (message header is empty). Click Start button to reprocess such emails. |
 | email has very few significant words to be processed by the Bayesian filter. Add such emails either to Whitelist, or Blacklist. |
Step 3. Training G-Lock SpamCombat.
To get the best performance of the program, you should train SpamCombat to classify your emails to spam and good. When the emails are retrieved, check whether they are properly categorized. If not, re-classify them yourself. To do this, use 


The emails flagged by 

SpamCombat deletes from the server only those emails, which have the checkbox in the Status checked. Make sure the checkboxes are checked for all spam messages. Then click Delete on the Toolbar to delete spam emails from the server.
Now you can safely run your email client to pull down the messages you really want to read.


